Painting Andersen’s Mountaineering Cabin

Anderson's Mountaineering Cabin Image
“Anderson’s Mountaineering Cabin,” 12” x 9” oil on canvas, Framed $913.00, Unframed $785.00

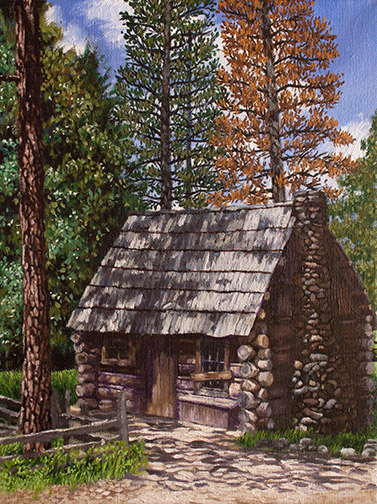
I recently finished this painting, begun en plein air, in Yosemite, during my stay as a Yosemite Renaissance artist in residence and I thought I’d walk you through its various stages from start to finish.

As many of you may have heard, during my residency, I invited many of my local artist friends to come up to the park and paint with me. This whole trip came together quickly, but even with short notice, 7 of them were able to make it. On this, our last day, 4 artists were painting with me.

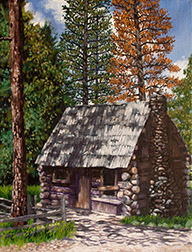
Anderson’s Cabin, is located in Pioneer Village, in Wawona, a collection of historic Yosemite structures from all over the park, brought together in one location to form a little trip back in time hamlet. There are many great structures to paint there, but we all decided on this one on that particular day.

Anderson Cabin Turp Wash Image
My ink blue turp wash underpainting, quickly maps out the scene lighting.

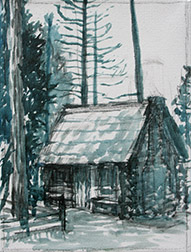
I started this outdoor painting, as I most often do, with an ink blue turpentine wash (50% painting medium, 50% solvent) underpainting. I find shadows outdoors tend to be cool, so the blue is a good choice and since I always work from dark to light, using the one color prevents me from having to mix multiple dark colors, prior to getting all my darks blocked in. Mapping the scene lighting out quickly is critical in plein air painting, as the light changes very quickly. Not having to mix multiple dark colors significantly speeds the process.

Anderson's Cabin Plein Air Image
My painting at the end of the plein air, on location painting session.

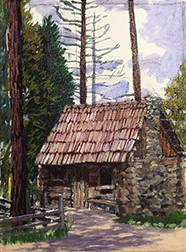
With the darks laid out, I quickly washed in general area color, prior to roughing in opaque paint. That way, if I miss tiny patches, known as holidays, with the opaque paint, they don’t show, the underlying canvas having been pre-tinted. With my darks down in ink blue, I begin adding medium value opaque colors, then lights and finally start replacing the ink blue dark wash with dark colors of the correct hue. Here’s the painting at the end of my 4 hour, on location, painting session.

I’m rarely happy with the final result of my plein air sessions and generally either work into the canvas back in my studio or use the painting as a color sketch for a larger studio painting. I’d committed to a show of the works we produced during the week, so, in the interest of time I’ve decided to add more detail to the actual plein air canvas this round.

Anderson's Cabin 5/25 Image
After 1st day in the studio

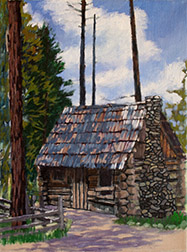
Reviewing the reference photos I shot on location, I realize that in painting the roof I painted out all the shadows from the trees. During this first session in the studio, I begin returning the shadows to the roof, add dark grout to the chimney and lines separating the individual logs that make up the walls of the cabin. I also finalize the sky and clouds, since everything else will be painted over this.

Anderson's Cabin 5/30
End of 2nd studio session

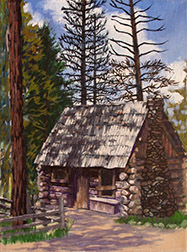
During my next session I finish most of the detailing to the roof (I found I needed to add light values, as well, in order to get the shadows correct), I begin to detail the log walls of the cabin and start adding back branches (painted out by the sky) and foliage to the trees behind the cabin.

Anderson's Cabin 6/1 Image
End of 3rd studio session

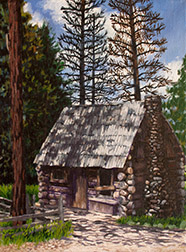
Another day and it’s about working the values on the chimney side of the cabin. I needed to adjust until that side of the building  looked like it was truly in shadow. Detailing the stone chimney, including adding the light that hits its stones here and there was a bit tricky, but I finally got it to a point where I was satisfied. I realized the ground shadows, there in the morning, but painted from memory, at the end of the day, were wrong, so I changed those.

Anderson's Cabin 6/6
A couple of sessions later

Through a couple more sessions I detail the foliage and trunks of the trees.

One last session of final details, including the detailing of the rock border around the grass in front of the chimney, takes me to the finish, shown at the top of this post.

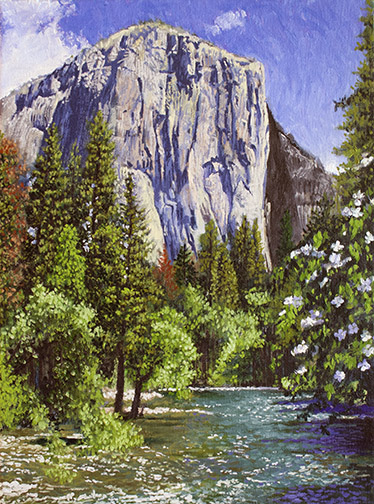
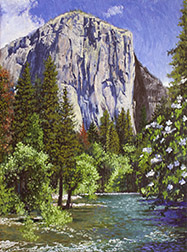
I popped the painting into a floater frame and took it wet, along with the other finish (El Cap & Dogwood) and plein paintings I created during the week, over to Gallery 5, so I could help Jon Bock install the show. The show is titled, “A Week in the Park: Plein Air Works by Trowzers Akimbo & Friends.” It’ll be there through June 22, 2017.

Painting El Capitan & Dogwood

El Cap & Dogwood Image
“El Cap with Dogwood,” 12” x 9” oil on canvas, framed $913.00, unframed $785.00

This is the monumental rock face in Yosemite that Alex Honnold just solo free climbed (Saturday June 3, 2017) in under 4 hours, breaking all previous records. Kudos to Alex. He may be able to climb it, but can he paint it?

I recently finished this painting in my studio, beginning it, on location, during my Yosemite Renaissance artist in residence stay in the park from May 8 – 14, 2017. To be more precise I began this piece, plein air, on the Saturday of my stay, May 13.

I’ve covered the details surrounding the discovery and difficulties encountered in actually getting setup to paint this site in earlier blog posts: Artist in Residence – Day 4, Day 5 and Day 6, if you’re interested. This post is going to be about the actual painting of that monument.

Through trial and error, I’ve come to the conclusion that the best way, for me, to paint plein air is by using the Indirect Painting method. I’ve tried the Direct Painting approach, most recently in the first few days of this residency, but I’ve always been unhappy with the results. In a nutshell, with Indirect Painting an underpainting, usually monochrome, is done before the full color over-painting is begun. By contrast, Direct Painting starts laying down full color from the get-go.

Here’s why I believe Indirect Painting is best. All painting should start with the darks in the scene and progress through the medium values, ending with the lights. And always, the painting should be worked as a whole. The darks are the armature that hold the entire painting together. Get your darks right and your halfway home with the entire painting. You want to work the painting as a whole, because each color or value you add, changes what’s already there, through juxtaposition. If you slave away on this corner or that, rendering to finish, while leaving the rest of the canvas untouched, you’re setting yourself up for a fall. When you add the rest of the color you’ll learn it changes what you so diligently rendered up front. The colors in that early rendering no longer look correct.

Anderson Cabin Turp Wash Image
Don’t have a shot of my El Cap monochrome turp wash, but here’s one from the following day.

The light changes quickly, when you’re painting outside, so it’s important to establish the lighting quickly. You can always choose to adapt to the light later in the day, if you like that better than what you started with, but if you don’t get that first lighting scheme down quickly, you’ll have no record of it. With direct painting you’re losing valuable time, mixing this color dark for the tree trunks, that color dark for the foliage, another dark color for the water, etc., all in an attempt to get all your darks down quickly. By using the Indirect Painting method, I mix one color and using turpentine washes (50% painting medium, 50% solvent) lay down all my darks quickly. I’ve speedily established the morning’s lighting scheme and I’m ready to start painting in color.

Plein Air El Cap & Dogwood Image
My plein air painting at day’s end. Note that many of the darks are my underpainting.

So after completing my darks underpainting, I spent the rest of the day laying down opaque color with confidence, knowing I had a darks map of the morning’s lighting conditions. In fact, I could concentrate on the colors of medium and light value first, knowing my underpainting darks were there and that I could change them to their proper colors later, if necessary. You may have noticed that my underpainting is ink blue. I find most outdoor shadows are cool, so the color is a good choice for plein air painting. When I do an underpainting of an indoor subject, like a still life or portrait, I’m more likely to use the warmer, burnt umber.

El Cap & Dogwood 05/17 Image
About 8 more hrs. working on the original plein air painting, in the studio.

Back in the studio, working from reference photos I’d taken that day out in the field, I tore into my original plein air painting, adding more detail, at a more relaxed pace. Since so much of the painting was resolved that day, on location, I felt comfortable concentrating my effort directly on the rock, rather than working up the detail in the entire painting gradually. El Cap was the hero here, I needed the confidence that it was working, before I could relax and work up the supporting cast. I also reworked the sky at this time. I liked the color and clouds in one of my later photos better than what I’d painted on location.

El Cap & Dogwood 05/22 Image
Adding detail to the foliage and river.

Comfortable that El Capitan was pretty much resolved, I started detailing the rest of the painting, working on it as a whole now: trees, bushes, river, dogwood, etc. You’ve probably noticed I like color. I carefully inspect every subject for less than obvious color I can enhance, the blues in the shadows on the right, cast on the river by the trees, for example. I also put back the aqua in the Merced River that I remembered being there in the morning, but missing when I finally got to the river at the end of the day. Unfortunately, your darks underpainting doesn’t help you remember what color things were when you started. There’s a special  advantage gained by, at least, starting your paintings on location, that’s lost when you paint from photos exclusively: color memory acquired through actually being there.

El Cap & Dogwood 05/23 Image
Getting the whitewater in and more detailing to the foliage.

Getting close to the finish here. Added more light values to the foliage. Notice how just adding the white water brings the river to life, bubbling and churning. Where I had a pond before, we’re now looking at the Merced River. I find it’s worth taking the time to place these small shape accurately, even if painted loosely, they can make the difference in whether your subject appears static or alive. I also added more detail to the dogwood here.

With just another session or two, I arrived at the finish (shown at the top of this post) : my final level of light values and a little necessary nit-picking here and there. Just in time for Alex to scale it!