
I’m all for the convenience of buying a commercial pre-stretched canvas at my local art store. I’m ready to start painting as soon as I get it home. I don’t have to spend days, buying the lumber at the lumber yard, fabricating the stretcher bars, stretching the canvas and, if I’ve chosen raw canvas, sizing and priming the canvas, with multiple coats of acrylic gesso (sanding each coat), before I can actually put the canvas up on my easel.
There are occasions/arguments, for building your own canvas from scratch, however:
- You want to be sure the canvas has been sized & primed following proper archival procedures. To achieve this you’d only need to stretch the canvas. You could buy and assemble commercial stretcher bars.
- You need a non-standard size canvas. Commercial stretcher bars are only available in one inch interval lengths (12,” 13,” 14,” 15″…etc.), not fractions of an inch.
- You need a larger canvas. Your local art store is unlikely to carry commercial stretcher bars in long lengths and I’ve never seen them available anywhere beyond 7′ in length.
I’m facing one of the above situation right now. I’ve got a commission for a mural-sized painting on canvas for a children’s hospital. The canvas needs to be 4′ x 7.’ I’ve found a source for commercial stretcher bars in the 7′ length, but I’d still need to figure out how to cross brace it, to prevent warping during the stretching process, and the 7′ lengths are pretty expensive to purchase and ship. I’ve decided it’s just as easy to build my own stretcher bars from scratch and I’m going to take you along on the ride.
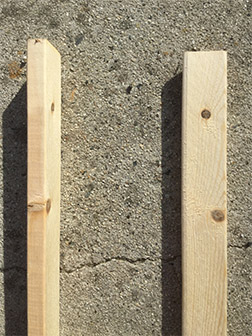
I’ll use 1″ x 2″ common pine for my stretcher bars. I prefer the more expensive kiln dried clear pine, but that’s very difficult to find. The first step is to determine how much lumber I’m going to need. I begin with a free-hand layout of my stretcher bars, including the cross-brace supports and dimensions. You need cross bracing every 2′ – 3,’ both vertically and horizontally to prevent your stretcher bars from warping, when you stretch the canvas over them.

From my sketch I can determine how much lumber I’ll need and in what lengths. Lumber yards usually sell lumber in lengths based on 1′ increments, but your local hardware store or big-box hardware center may only provide lumber in fixed lengths (often 8′), so if one of the later two is going to be your source, check lumber availability out ahead of time.
For my 4′ x 7′ canvas I’ve decided I’m going to need six, 8 foot 1″ x 2″ sticks. They break down like this:
- Two 8′ sticks provide two 7′ stretcher bars
- Two 8′ sticks provide one 4′ stretcher bar & one 4′ brace each
- One 8′ stick provides the 8′ brace
- One 8′ stick provides two 4′ braces
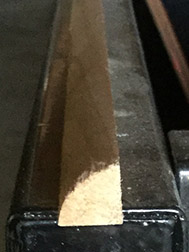
I’m also picking up three 8′ and one 9′ length of 1/2″ quarter-round trim. I’ll explain what this is and why I need it later in this post. I’m also purchasing a small piece of 1/4″ masonite or plywood (if they have a scrap, that will be fine) to make corner triangles to hold my finished stretcher frame square.
Back home with my supplies, I’m ready to begin. We’re going to build our stretcher bars with the lumber standing on its narrow 1″ side (actually about 5/8″), so when complete, our stretcher frame will have a side depth equal to the 2″ side of the lumber (actually about 1 7/16″).
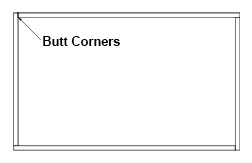
I start by measuring and cutting the stretcher bars (as opposed to the braces). We’re going to butt the corners of our stretcher bars together, as indicated at left. This means we’ll need to subtract the thickness of our sticks from the 7′ and 4′ length to arrive at a finished canvas that is exactly 4′ x 7.’ Since our 1 x 2s are 5/8″ thick, I subtract 5/8″ from my 4′ and 7′ total lengths to arrive at 3′-11 3/8″ and 6′-11 3/8″ respectively. Make your cuts straight across (at 90 degrees). You can use a hand saw or power saw (whatever you have available) to accomplish this.

Next I’ll cut my 4 corner right triangles from the masonite or plywood I purchased. For a canvas this size, I’ve decided to make my triangles 4″ on the 90 degree sides. For smaller canvases you can create smaller triangles.
With the parts cut, I’m ready to assemble. I nail each butted corner of my 1 x 2s together.
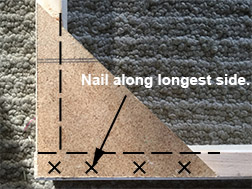
With the outside of the stretcher frame now nailed together, I need to square it (make each corner a true 90 degrees). I start by placing two of my four triangles in corners diagonally opposite each other. I nail the two triangles along their longest side only. Next I measure diagonally from one corner of the frame to the other. Then I measure the distance from the other two corners diagonally located across from each other. Both distances need to be exactly the same. If they’re not, I’ll adjust the square of my frame,

moving one of the corners left or right until they do measure the same. Once both measurements are the same, I nail down the other sides of the two triangles. This will lock my stretcher frame square. I nail the remaining two corner triangles in place along both of their respective sides.
If you have distances of more than 2 1/2′ along any side of your stretcher frame, you’ll need to add supports. Support should be added at least every 2 1/2.’ Stretching canvas over your frame creates a great amount of tension on the frame. Without the braces, the frame will bow/warp.
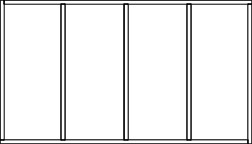
My 4′ x 7′ stretcher bar frame requires 3 braces for the long side and 1 for the 4′ side. I’m starting with the 3 braces that will support the long sides. I subtract 1 1/4″ from my total 4′ length to compensate for the thickness of outside frame on each side (5/8″+5/8″ = 1 1/4″) and cut each (3) of the braces to a length of 3′-10 3/4.” I then nail the braces in place at equal intervals along the 7′ length.
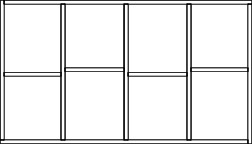
Now I’ll move on to the horizontal brace. I’ll cut this long brace into 4 pieces (one for each space created by the vertical braces) and stagger them along the horizontal center line to facilitate easy nailing. I take an accurate measure of each horizontal space and cut my braces to length accordingly. I then nail each brace in place.
I built frames just like this for many years, but always had to gingerly step around an inherent problem in the design. Since the stretched canvas made full contact with the frame and braces, their edges could telegraph onto the surface of the canvas, as I was painting, if I wasn’t careful. Rotating the braces 90 degrees, so their widest side faced the back of the canvas and positioning them in the exact middle, front to back, of the frame prevented their telegraphing, but this allowed the frame to warp on the front or back edge, when the canvas was stretched over the frame and still left me with the edges of the perimeter frame telegraphing.
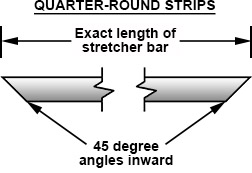
While visiting our property in Taos, NM, an artist friend living there showed me the new custom canvases he’d just had built. They were a little deeper than the ones I’d been building myself and, on examining the backside, I discovered a great solution to my telegraphing problem. Here’s where the 1/2″ quarter-round trim we purchased at the lumber yard comes in (and you thought I’d forgotten about that). By nailing the quarter-round trim, curve side facing in, along the top of the perimeter of our stretcher bar frame, we raise the canvas 1/2″ above the framing lumber. Because of the curve, the canvas only makes contact with the quarter-round on the outside edge of the trim, completely eliminating the telegraphing problem. Eureka!
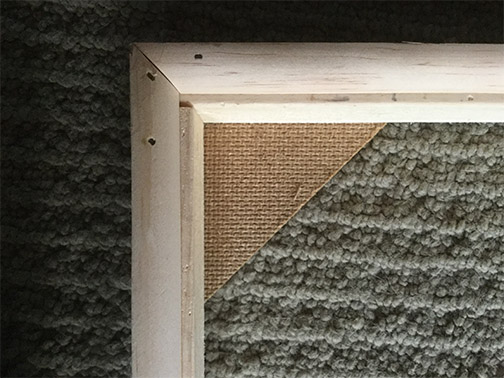
To do a professional job with the quarter-round you need to invest in a basic miter box and the box saw that works with it, to cut accurate 45 degree corners. I measure my quarter-round to exact lengths of my stretcher bars (in my case two 7′ and two 4′ pieces). This is the top or outside measure of my 45 degree cuts. I make my cuts accurately, then butt my strips at the corners, making sure the edge of the quarter-round aligns with the outside edge of the stretcher bars. I nail the quarter-round in place (one nail about every 8″).
That’s it! A lot more complicated to describe than do. I’ll walk you through the process of stretching canvas over the stretcher bars, as well as how properly prepare the canvas for painting, in a future post.

Isn’t that 1/2 round you’re using? Not 1/4 round? 1/2 round softens the edge of the canvas, yes? 1/4 round, mounted with a flat side toward the outside edge of the stretcher, leaves a sharp edge.
No, Keven, I use 1/4 round. A sharp edge it what I’m after (not actually that sharp, once canvas is stretched over it). The problem I have with 1/2 round is that it rounds the outside edge of the canvas too much and, more importantly, is telegraphed through the canvas by brush strokes and paint built up. 1/4 round is my personal preference.
thanks for saying that! I was wondering the same thing on 1/2 vs 1/4
You’re welcome, Randy.
This is great, thanks! I’ve been building cradled panels to paint on, and stumbled upon this in my research. Not the same, I know, but it’s something I would consider trying. I enjoy making the surface as well as the art (even though I’m pretty unskilled at woodworking).
Glad to be of help, Matt!
This is a good and very informative piece, I wish I had when I was a younger artist. I have to questions: The first is about the wood sizes, if it says 1″ x 2″ why is it reading as 5/8″.I use the metric in Switzerland and this seems a bit odd and makes the measurements difficult to reach, but this is only a curiosity question. My second more important question is The nails used and are the specifics of size and durability factors I need to consider? I also love the use of quarter round bar, genius.Can this be glued and are the nails the same as others. Sorry I’m going on and on, but thanks again in advance for your tutorial.
In answer to your first question, Scott, none of these images are to scale. In the US the 1″ x 2″ size given to the lumber is actually the raw size of the lumber, before the mill has run it through the finishing planner. Actual size is about .75″ x 1.625″ when sold. I use what are called “finish” nails in the US. Any type of nail can be used, but, importantly, the diameter should be small enough that it does not crack or split the wood. Sometimes, depending on the quality or dryness of the wood, you’ll find it necessary to pre-drill the nail holes, prior to pounding in the nails, to avoid cracking or splitting the wood. I use a smaller finish nail in attaching the quarter round, than I use for attaching the corners of the stretcher bars together. I suppose you could glue the quarter round onto the stretcher bars, provided you can keep them in position, while the glue dries.
I am wanting to do 16″ x20″ PBN on canvas–should I stretch first or paint first?
Also–best way to join corners before masonite–screws or dowels?
Great article!! A definite saver! BOOKMARKED!
People work both ways. My preference is to stretch first (makes it easier to size and prime the canvas [if you’re using raw canvas], before painting). I have painted on unstretched canvas before, when I was in too big a hurry to stretch it first, but the difficulty there is lining the finished painting up on the stretcher bars, properly, since you stretch the canvas with the painted side face-down, stretcher bars on top laying against the backside of the canvas. I join the corners with finish nails. I actually use a n pneumatic finish nail gun (since I happen to own one). Screw should work too, provided they’re small enough in diameter. Make sure you pre-drill holes for the screws, if you go that way, to avoid cracking or splitting the wood. This migh also be necessary if you’re using nails, depending on the diameter of the nails.
Have you thought of using pocket screws? Nice of you to share your knowledge and experience.
Since the corners of my stretcher bars are butt joints, I assume you’re asking about using pocket screws in attaching the internal supports, so they could be aligned in straight lines. You could certainly do that, if you didn’t mind spending the additional time drilling the pockets and driving in the screws. While it would certainly look polished, it’s unnecessary, as far as purpose of the supports is concerned. My goal is to build, size and prime my canvases as quickly as possible and get back to painting, so my construction of the stretcher bars is done with pneumatic nail and brad guns.
I’ve been researching stretching an existing 8’ by 14’ canvas and finally after quite some time found your article…which lays out a very practical method and minimum bracing dimensions. As an architect and painter, this was very helpful. The 1/4 round I’ve read about along my journey, so I was reassured to hear your ‘eureka’ moment. And then learning you’ve got a place in Taos I thought I’d reach out. We do as well on the old Gorman place and spend our summers in Taos and winters in TX. Would enjoy connecting at some point. Thank you for sharing!
Jim
Glad to hear this post was helpful, Jim. Sadly, we sold our property in Taos years ago, when family issues prevented us from making our planned move there. Today, we kick ourselves, regularly, for letting that property go.
Hi! Great article and very clear!
I just wanted to check on the quarter round part. It’s nailed in to the stretcher frame, with one of the two flat sides flat against that frame. So am I correct that the other flat side faces inward, toward the center of the frame and painting? And one thing I’ve been worried about is the sharp edge on the frame itself — if I stretch the painting, worried that it might rip or be cut by a corner. Would the quarter round help with this as well?
Hi David,
Thanks for the response/question. No, the other flat edge faces to the outside of the stretcher bars. I’m looking for a precise edge when creating these stretcher bars, one that is not going to telegraph the edge of the stretcher bar, through the canvas when painted (a knife edge). I’ve never experienced a rip or tear in the corners.