Building Canvas Stretcher Bars from Scratch

I’m all for the convenience of buying a commercial pre-stretched canvas at my local art store. I’m ready to start painting as soon as I get it home. I don’t have to spend days, buying the lumber at the lumber yard, fabricating the stretcher bars, stretching the canvas and, if I’ve chosen raw canvas, sizing and priming the canvas, with multiple coats of acrylic gesso (sanding each coat), before I can actually put the canvas up on my easel.

There are occasions/arguments, for building your own canvas from scratch, however:

  • You want to be sure the canvas has been sized & primed following proper archival procedures. To achieve this you’d only need to stretch the canvas. You could buy and assemble commercial stretcher bars.
  • You need a non-standard size canvas. Commercial stretcher bars are only available in one inch interval lengths (12,” 13,” 14,” 15″…etc.), not fractions of an inch.
  • You need a larger canvas. Your local art store is unlikely to carry commercial stretcher bars in long lengths and I’ve never seen them available anywhere beyond 7′ in length.

I’m facing one of the above situation right now. I’ve got a commission for a mural-sized painting on canvas for a children’s hospital. The canvas needs to be 4′ x 7.’ I’ve found a source for commercial stretcher bars in the 7′ length, but I’d still need to figure out how to cross brace it, to prevent warping during the stretching process, and the 7′ lengths are pretty expensive to purchase and ship. I’ve decided it’s just as easy to build my own stretcher bars from scratch and I’m going to take you along on the ride.

Pine 1″ x 2″s

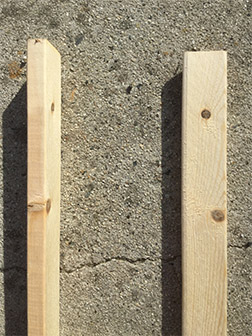
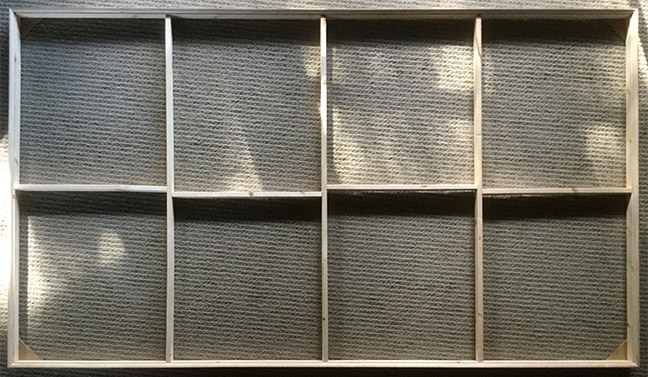
I’ll use 1″ x 2″ common pine for my stretcher bars. I prefer the more expensive kiln dried clear pine, but that’s very difficult to find. The first step is to determine how much lumber I’m going to need. I begin with a free-hand layout of my stretcher bars, including the cross-brace supports and dimensions.  You need cross bracing every 2′ – 3,’ both vertically and horizontally to prevent your stretcher bars from warping, when you stretch the canvas over them.


My Sketch

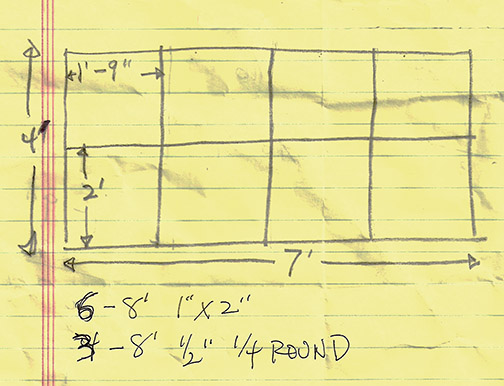
From my sketch I can determine how much lumber I’ll need and in what lengths. Lumber yards usually sell lumber in lengths based on 1′ increments, but your local hardware store or big-box hardware center may only provide lumber in fixed lengths (often 8′), so if one of the later two is going to be your source, check lumber availability out ahead of time.

For my 4′ x 7′ canvas I’ve decided I’m going to need six, 8 foot 1″ x  2″ sticks. They break down like this:

  • Two 8′ sticks provide two 7′ stretcher bars
  • Two 8′ sticks provide one 4′ stretcher bar & one 4′ brace each
  • One 8′ stick provides the 8′ brace
  • One 8′ stick provides two 4′ braces
1/4 round stock

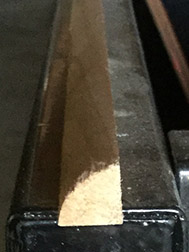
I’m also picking up three 8′ and one 9′ length of 1/2″ quarter-round trim. I’ll explain what this is and why I need it later in this post. I’m also purchasing a small piece of 1/4″ masonite or plywood (if they have a scrap, that will be fine) to make corner triangles to hold my finished stretcher frame square.

Back home with my supplies, I’m ready to begin. We’re going to build our stretcher bars with the lumber standing on its narrow 1″ side (actually about 5/8″), so when complete, our stretcher frame will have a side depth equal to the 2″ side of the lumber (actually  about 1 7/16″).

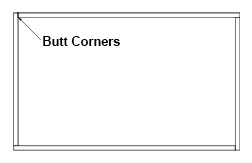
I start by measuring and cutting the stretcher bars (as opposed to the braces). We’re going to butt the corners of our stretcher bars together, as indicated at left. This means we’ll need to subtract the thickness of our sticks from the 7′ and 4′ length to arrive at a finished canvas that is exactly 4′ x 7.’ Since our 1 x 2s are 5/8″ thick, I subtract 5/8″ from my 4′ and 7′ total lengths to arrive at 3′-11 3/8″ and 6′-11 3/8″ respectively. Make your cuts straight across (at 90 degrees). You can use a hand saw or power saw (whatever you have available) to accomplish this.

Corner right triangle

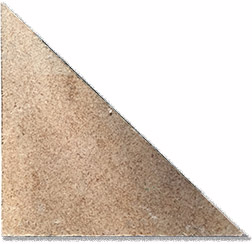
Next I’ll cut my  4 corner right triangles from the masonite or plywood I purchased. For a canvas this size, I’ve decided to make my triangles 4″ on the 90 degree sides. For smaller canvases you can create smaller triangles.

With the parts cut, I’m ready to assemble. I nail each butted corner of my 1 x 2s together.


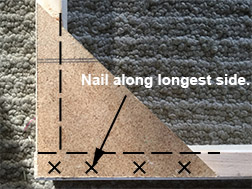
With the outside of the stretcher frame now nailed together, I need to square it (make each corner a true 90 degrees). I start by placing two of my four triangles in corners diagonally opposite each other. I nail the two triangles along their longest side only. Next I measure diagonally from one corner of the frame to the other. Then I measure the distance from the other two corners diagonally located across from each other. Both distances need to be exactly the same. If they’re not, I’ll adjust the square of my frame,

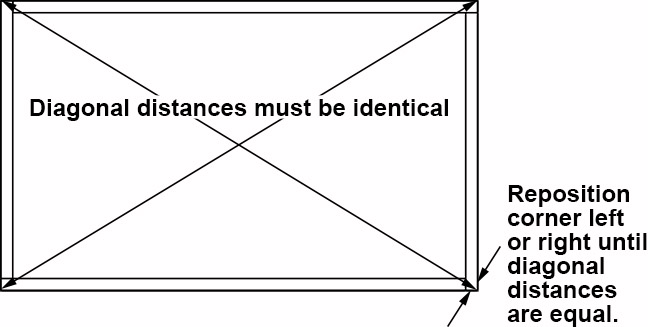
moving one of the corners left or right until they do measure the same. Once both measurements are the same, I nail down the other sides of the two triangles. This will lock my stretcher frame square. I nail the remaining two corner triangles in place along both of their respective sides.

If you have distances of more than 2 1/2′ along any side of your stretcher frame, you’ll need to add supports. Support should be added at least every 2 1/2.’ Stretching canvas over your frame creates a great amount of tension on the frame. Without the braces, the frame will bow/warp.

Vertical braces

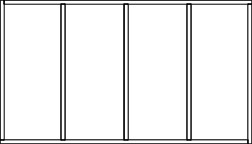
My 4′ x 7′ stretcher bar frame requires 3 braces for the long side and 1 for the 4′ side. I’m starting with the 3 braces that will support the long sides. I subtract 1 1/4″ from my total 4′ length to compensate for the thickness of outside frame on each side (5/8″+5/8″ = 1 1/4″) and cut each (3) of the braces to a length of 3′-10 3/4.” I then nail the braces in place at equal intervals along the 7′ length.

Staggered horizontal brace

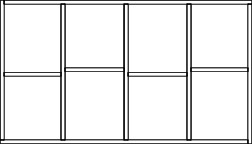
Now I’ll move on to the horizontal brace. I’ll cut this long brace into 4 pieces (one for each space created by the vertical braces) and stagger them along the horizontal center line to facilitate easy nailing. I take an accurate measure of each horizontal space and cut my braces to length accordingly. I then nail each brace in place.

I built frames just like this for many years, but always had to gingerly step around an inherent problem in the design. Since the stretched canvas made full contact with the frame and braces, their edges could telegraph onto the surface of the canvas, as I was painting, if I wasn’t careful. Rotating the braces 90 degrees, so their widest side faced the back of the canvas and positioning them in the exact middle, front to back, of the frame prevented their telegraphing, but this allowed the frame to warp on the front or back edge, when the canvas was stretched over the frame and still left me with the edges of the perimeter frame telegraphing.

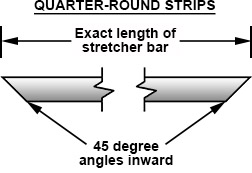
While visiting our property in Taos, NM, an artist friend living there showed me the new custom canvases he’d just had built. They were a little deeper than the ones I’d been building myself and, on examining the backside, I discovered a great solution to my telegraphing problem. Here’s where the 1/2″ quarter-round trim we purchased at the lumber yard comes in (and you thought I’d forgotten about that). By nailing the quarter-round trim, curve side facing in, along the top of the perimeter of our stretcher bar frame, we raise the canvas 1/2″ above the  framing lumber. Because of the curve, the canvas only makes contact with the quarter-round on the outside edge of the trim, completely eliminating the telegraphing problem. Eureka!

Finished, butted quarter-round corner.

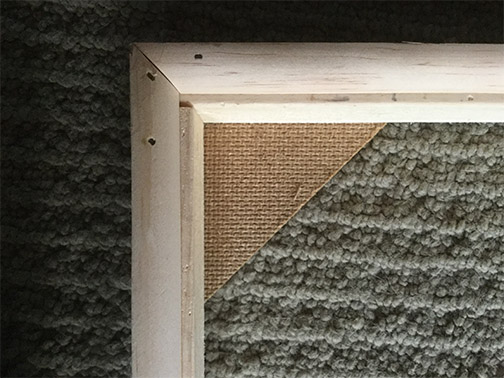
To do a professional job with the quarter-round you need to invest in a basic miter box  and the box saw that works with it, to cut accurate 45 degree corners. I measure my quarter-round to exact lengths of my stretcher bars (in my case two 7′ and two 4′ pieces). This is the top or outside measure of my 45 degree cuts. I make my cuts accurately, then butt my strips at the corners, making sure the edge of the quarter-round aligns with the outside edge of the stretcher bars. I nail the quarter-round in place (one nail about every 8″).

That’s it! A lot more complicated to describe than do. I’ll walk you through the process of stretching canvas over the stretcher bars, as well as how properly prepare the canvas for painting, in a future post.

Making Marks vs Blending

Cézanne Still Life Image
“Still Life with Chest of Drawers,” Paul Cézanne.

One of the final levels of sophistication in painting is the character of the marks you make on your canvas. Growing artists often overlook this attribute in painting, choosing to blend everything instead. Over-blending is a contrived approach to painting surfaces and removes the power and character of the painting process that marks bring to the work.

I suppose this over-blending tendency comes from seeing the paintings of the Renaissance masters, who’s surfaces appear blended. Those surfaces were the result of the painting mediums and required application techniques available at the time. Most artists of the fifteenth century were painting with egg tempera, a very transparent painting medium. The application required elaborate underpainting and glazing techniques, where a complete, dark, monochromic underpainting base was created, before layer after layer of semi-transparent egg tempera color was glazed, painstakingly, over the top. The slow building up of these many semi-transparent levels gave the edges in the final surfaces of the painting a very smooth and blended appearance.

Sargent Painting
“Alice Vanderbilt Shepard Amon Carter,” By John Singer Sargent

Sargent Detail
“Alice” close up

If you examine the paintings of later oil painting masters, you’ll find the character of THEIR surfaces to be more active. Take a close look at a painting by John Singer Sargent, for example. In your memory you see his surfaces as smooth and blended, but through a more precise examination you’ll realize they’re made up of precisely placed individual marks. Areas of less focus, like her lace blouse and jacket are painted with even more energetic strokes.


Other painting giants were even more expressive. Each with a character to their marks that were all their own.

Manet Detail
Detail, “Le Printemps,” by Edourd Manet

 
Monet Detail
Detail, “Madame Monet and Her Son,” by Claude Monet

 
Renoir Detail
Detail, “Luncheon of the Boating Party,” by Pierre-Auguste Renior

 
Degas Detail
Detail, “Waiting,” by Edgar Degas (pastel)

 
Cézanne Detail
Detail, “Still Life with a Chest of Drawers,” Paul Cézanne

 
Van Gogh Detail
Detail, “Self Portrait,” by Vincent Van Gogh
Close values soften edges

While most subjects present both hard and soft edges, you don’t have to blend an edge to make it appear soft. A more interesting approach is to retain your marks and simply apply a series of close


Close values soften edges

values to turn an edge, like Vincent did on the leading edge of his face and the back of his head in the above, “Self Portrait.”


One of the best ways I know of for breaking the habit of blending everything is to do what you should be doing anyway and work the entire painting at the same time, working from rough to tight. When you’ve adjusted everything else to your satisfaction, then and only then ask yourself if any of the edges need to be blended. I think you’ll find that they do not!

The Dilemma Behind the Demonstration

Left: Painting at demo end, Right: Same painting after an hour with it in the studio.

I demonstrated my approach to abstract painting for a local art group, Alliance of California Artists yesterday. I enjoy providing art demonstrations of any kind and find verbalizing the steps I take, teaches me a lot about myself and my dance with the canvas. It was a good, attentive group, they asked questions, when they had them and I did my best to answer, throughout the length of the session.

I believe in demos. It’s fascinating to see how other artists work and how they solve the same challenges we all face in every painting session, but are we truly witnessing how the demonstrating artist works. In the 2-3 hrs. usually available for a demo, it’s unlikely we’re getting anything but an abbreviated/abridged version of the artist’s approach. I know that’s true with my demos, anyway.

On average, it takes me 30-40 hrs. to complete a painting. So when I’m demonstrating my process over 2 or 3 hrs. I have to strip a tremendous amount out my normal process, if I’m to give the audience even a hint of what my creation of a painting looks like. It’s a race, from start to finish, to accomplish all you can, before the ending buzzer sounds.

On top of that, anyone who’s read, Betty Edward’s, “Drawing On the Right Side of Your Brain,” knows you can’t communicate with an audience (a left brain function) and paint in the zone (a right brain function) at the same time. So, during a demo the individual demonstrating is jumping in and out of both left and right brain hemispheres. He or she never remains deep in the creative zone for any length of time during a demonstration, so normal problem solving is handicapped. They’re making quick, snap choices, rather than the slow introspective decisions arrived at alone in the studio.

I’ve tried a few thing to get around these time challenges, but I’m not sure they’re effective. I’ve shown up with my preliminary drawing already down on the canvas, but this takes away the opportunity for viewers to watch how I proceed through a drawing. I’ve even pre-finished multiple canvas at different stages of development, like your typical cooking show does. I’d begin a drawing before the eyes of the audience, then pull a canvas with the drawing already completed from under the table. I’d then start execution of my turp wash underpainting on this drawing, before revealing a canvas with a finished underpainting on it, leaving the lions share of the demonstration to be my blocking in color and detailing approaches. I’m not sure this is what the viewers had come to see.

I’ve come to the conclusion that it’s best to start with a blank canvas and perform the whole process, albeit a truncated version, before the eyes of the audience. I’m often disappointed in the product of the session, but I’ve given the viewers at least a glimpse into my overall approach to problem solving. And isn’t that why they invited me there in the first place?

Painting in the “Pink”

Pretty in Pink Painting
“Pretty in Pink,” 30″ x 4,” oil on canvas, © 2017 Trowzers Akimbo.

After completing two abstract bird paintings (“At Risk” and “Modern Building Materials”) for the “Avian: Birds in a Changing World” exhibit (a show to benefit our local Audubon Society chapter and Sierra Art Trails), I began thinking about what I wanted to enter in the Yosemite Renaissance show this year

“At Risk” (left) and “Modern Building Materials” (right), © 2017 Trowzers Akimbo

For those unaware of this exhibit and competition, Yosemite Renaissance is an annual show held in the Yosemite Museum Gallery, in Yosemite Village, in Yosemite National Park. It takes place in February, encourages non-traditional approaches to artworks focused on Yosemite and the surrounding Sierra Nevadas and offers a stiff competition, with only a 7% — 8% acceptance rate. After leaving Yosemite the show travels to various venues around California for a year. I love it, when I get into this show!

Yosemite Falls from Sentinel Swinging Bridge Painting
“Yosemite Falls from Sentinel Swinging Bridge,” 30″ x 40,” oil on canvas, © 2017 Trowzers Akimbo.

I had one piece, an abstract view of “Yosemite Falls from the Sentinel Swinging Bridge,” which was an appropriate piece to enter, but I wanted to submit something brand new, fresh off the easel and into the competition for the show. Around this time, a mountain lion had been spotted in our neighborhood, encouraging me to take a baseball bat with me each night, as I traveled out to the far corners of our property to turn on security lights. I believe this got into my head, as I decided to take on a mountain lion in my next painting. I’m going to walk you through my steps in painting “Pretty in Pink” here.

Mt. Lion Sketch
My rough computer sketch

I started this one with a rough sketch, done with a Wacom Tablet and stylus connected to my computer. The computer is a great preliminary visualization tool, allowing me to easily grab a section of my sketch, move it, resize it, rotate it, etc and try what ifs, by turning layers off and on. Doing the same thing on paper, would be difficult and much more time consuming. Living in the Sierras, I’m told mountain lions are often near by, when I hike or mountain bike into wooded areas. They’re just out of site. I recall this being portrayed well in Michael Mann’s film version of “The Last of the Mohicans,” as Hawkeye and his Native American adopted father and brother are guiding the British colonel’s two daughters to a fortress to join their father. The older daughter silently perceives a mountain lion under the foliage, just off the trail, watching them pass. I decided to portray this silent laying in wait, graphically.

Mt. Lion Sketch on Canvas
My charcoal pencil/oil paint drawing on the canvas

Often my sketch is just a rough concept, a starting point to be further developed on the canvas, but this sketch was spot on, so I started recreating it on my canvas, just as portrayed in the original sketch. Due to the complexity, it proved difficult to recreate accurately and I told myself next time I had a sketch this complex, I’d use a grid system to create the drawing on canvas. After a lot of adjustments, in charcoal pencil and oil paint, I finally had a drawing I was happy with on the canvas.

Mt Lion Base Color
Most of the base color blocked in.

A few painting sessions and I had all the base color blocked in. If I think of a way I might want to vary the color, as I’m blocking in, I execute it right then. If it doesn’t work out, as I begin to refine the painting, I can always paint things over, but I rarely just lay in solid flat colors at this stage. Note how I’ve moved the cat’s muzzle down, as I blocked in the color. I continue to refine my drawing, as necessary, as the painting develops. With the base color in, my cat, background and foreground leaves are all pretty equal in importance. While my goal was to hide the puma, to a great degree, in its environment, I’m going to need to separate the lion a bit more from its environment.

Adding Patterns
Adding patterns

I added a hair pattern all over the mountain lion and different granite patterns to the rock surfaces. This adds a bit more complexity to the scene and, because patterns recede, is the first step in separating the mountain lion from the rest of the environment. Once the patterns dry, I’ll be able to use transparent glazing, as well as opaque painting to move planes forward or back and bring more importance to the cougar.

Detailing the Mt. Lion
Glazing, grass tuft detailing and leaf patterns

With a lot of the glazing completed I’m happy with the level of separation between cat and environ and the way certain planes advance, while others recede. I’ve also done some detailing on the stylized tufts of grass here. With so much of the painting completed, I determine how I want to finalize the foreground leaves, deciding on a here and there line pattern, inspired by the veins present on oak leaves.

At this stage, all that’s left is to apply the pattern to the remaining leaves, add a few last bits of detailing here and there and somehow take the uniformity away from the violet glazing around the leaf on the right, above the lion’s rump. I decide that some loosely applied ochre paint is the answer here. All these final additions can be viewed in the finished painting at the top of this post.

I completed “Pink” just in time to make the Renaissance entry deadline and recently learned it has been accepted into this years show!

Painting from Photographs

Painting & Photos of Wawona Covered Bridge
Begun on location, I utilized both of these photos to finish my “Wawona Covered Bridge” painting in the studio.

I just ended my fall 10 week “Painting Tune-Up” workshops with a discussion about painting from photographs. It would be great to always paint from life, that remains my goal and should be yours, but there are always situations when working from a photograph is the best or even the only solution. With that in mind, I thought I’d discuss the pitfalls to watch out for and some techniques for getting the most out of working from photos.

Painting from photographs gets a bad rap. It’s always better to work from life (I’ll discuss why later in this post), but in certain situations a photograph is the only way to access a subject. Here are some situations when photography offers a solution:

• Painting postumous portraits
• Insufficient time to finish a painting on location
• Freezing quickly moving subjects in motion
• Locations offering no place to set up an easel
• Limited physical mobility
• Capturing a record of your subject, as insurance, for future emergency use
• Documentation of subjects you want to return to, when time allows
• Capturing intricate subject details for later reference
• Getting your painting on a computer for non-destructive experiments

Photographs can be a wonderful aid for artists, but they do present some inherent problems for which we need to compensate. A photograph is a technical recording of a live subject. It can’t capture the physical or emotional feeling presented by a subject or location that being there can.

A painting from life is a direct personal interpretation of all the 3 dimensional information presented by the subject. A photograph is a pre-flattened 2 dimensional recording of a 3 dimensional subject. It’s missing all the 3 dimensional information.

Even today’s latest cameras can only capture a subset of the full color and value spectrums present in a subject. The lighter areas in photos tend to be blown out (over-exposed) and the darker areas darker than the original subject (masking detail in the shadows).

Because a camera evenly records all attributes of the subject before it, painting exclusively from photographs can lead to over detailing, no distinction of detail in the focal area from the rest of the painting.

Cameras also inject their lens distortions into photographs, exaggerating foreshortening and distorting perspective towards the edges of the image. You need to be aware and compensate for these inaccuracies, when painting from photographs.

Photo Exposure Bracketing Image
Example of “bracketing” your photographs with multiple exposure, © 2017 Blaize.

Here are a few good practices to overcome the problems and limitations in photography, discussed above.

  1. Begin your paintings from life, whenever possible, even when you know the majority of  work will be done in the studio from reference photographs.
  2. Shoot your reference photos a bit wider than the composition on your canvas. You’ll often find, during the painting process, that you want to bring elements along the edges further into frame.
  3. Bracket your reference shots. Bracketing is a term to describe the practice of taking multiple shots of your subject at different exposure settings, from slightly over-exposed, through correct exposure, to slightly under-exposed. Most cameras and smart phones today have a bracketing setting to automate this process.
  4. Examine your subject, through the camera’s viewfinder, for the following: details that require dedicated shots, light areas that will likely over-expose or wash out, dark areas that will under-expose, losing color and details. Compensate for these losses by making mental and physical color notes.
  5. Paint a color key thumbnail or add patches of the correct colors in unfinished areas of your painting, while on location.
  6. Avoid working from photographs shot by others. You have no relationship to the live subject in these.
  7. Paint from the photos you’ve taken A.S.A.P. while the actual location is still fresh in your memory.
  8. Simplify areas of unnecessary detail present in the photo
  9. Correct lens distortions present in the photos

We all must work from photos at one time or another. Remaining aware of photo limitations and compensating for their flaws assures a successful outcome in the painting from photographs process!

Rejection

Left to the Village Painting
“Left to the Village,” by Trowzers Akimbo, rejected by the 2016 Yosemite Renaissance exhibit/competition

First, let me apologize for my lack of new posts over the last two weeks. I’d received two new commissions for mural paintings from two different children’s hospitals a few day apart from each other and they required me to create 4 designs in 16 days. This, along with the 3 workshops I’ve been teaching each week, made it impossible for me to put together new posts.

Anyway, now that I’m writing again I wanted to talk about rejection. It seems to be going around lately! I recently ran into an artist friend, at an opening, who told me her submission had been rejected from a recent exhibit/competition. This from one of the most sought after, financially successful artists I know.

Two days later, at a local art organization holiday party, two more artist friends presented their work, prefacing with the fact the pieces had been rejected by recent shows. This prompted me to ask all present (about 50 artists) to raise their hands if they’d ever been rejected from an exhibit or competition. Every hand in the place shot up!

These bold admissions illustrate an important point for all artists, beginning or well established, to remember. Rejection is just a part of being an artist and rarely has anything to do with the piece of art being rejected. Instead, it has everything to do with the judges making the selection: their personal tastes or bias, their education, life experience, relationships, mood, even what they had for breakfast and their drive to work that morning. Different judges or a different day, completely different result.

Vincent Van Gogh only sold a single painting, during his lifetime.They hated his stuff! The Impressionist proudly chose their art movement’s name from a “catty” art critic, rejecting their work in whole as simply impressions of paintings, in a newspaper review he’d written.

All artists, big and small, are faced with rejection of their work. It goes with the territory. It signifies nothing. Don’t let it discourage you!

Brush Up

Applying Paint Photo

Too often we overlook the full capabilities of the tools in our paint boxes and forget that they were designed to ease our workload and extend the impact of our work. Let’s talk a bit about brushes.

Ancient Egyptian Brush Photo
Ancient Egyptian Brush formed from sticks flayed at one end.

The artist paint brushes in our hands today are the product of centuries of evolution. They are modern marvels, the result of extensive, in the field, use and contemporary engineering. That’s all wasted, however, if we ignore all they can do.

It’s important to use the proper brush for the job at hand. My favorite workhorse brush, when painting with oils or acrylics, is the bristle brush. This baby’s stiffness can move the thickest of paints across a canvas and is great for scumbling, dry brush and impasto techniques. It’s my go to brush for most of my painting needs.

When you’re painting wet into wet, especially in a single session, alla prima, you’ll find the bristle brush less effective in paint over paint application. It’s rigidity tends to pick up the wet paint from lower layers, mixing them with the new paint you’re attempting to apply, preventing you from applying clean new strokes. This is when you want to utilize your sable brushes. A light touch with one of these, will float the new color on top of the previous applied wet layers.

Glazing (transparent layers of color utilizing large amounts of painting mediums) can be accomplished by either bristle or sable brushes. It all depends on the viscosity of your mixture.

I covered the proper brush for the job in more detail in a previous post, “Be Good to Your Brushes & They’ll Be Good to You!

Grasses Image
Thin, overlapping vertical & diagonal strokes for grass.

What I actually wanted to talk about in this post was allowing your brushes to do some of the work for you. All the subjects you paint possess visible characteristics quite different from each other. These characteristic are the result of things like growth patterns, chemical make-up, environment wear, etc. The leaves on a tree present a much different surface characteristic than, say, the granite face of Half Dome, in Yosemite, for example. Yet, it’s easy to ignore this fact and apply paint to canvas in the same uniform manner, when executing all elements in our compositions. Boring!

Clouds Image
Rolling a bristle brush around, with occasional edge flicks to communicate clouds.

Instead, pay attention to how the elements you’re painting grow, what they’re made of, how they move, how their surface reflects light and color and then allow your brushwork to communicate this. The British painter, Alwyn Crawshaw, famous for tv shows, books and videos on painting, suggests you try to become the element you’re painting, “I’m a fluffy little cloud!” Then paint the element accordingly. A bit over the top form me, but I get what he’s saying.

El Cap Detail Image
Crisp vertical strokes for granite.

What does this actually mean: allow your brush to reflect the characteristics of various elements in your paintings? Well, when studying the granite face of a monument like Half Dome or El Capitan, in Yosemite, you’ll notice it has very chiseled characteristics with strong vertical concave and convex up and down forms. A great approach in painting these, might be to use the edge of a flat brush to create vertical strokes, occasionally rolling the brush a bit, from side to side, to vary width in the process.

Leaves Image
Globbed paint then flicked at the edges for leaves.

Foliage on trees often starts with a glob of paint and ends with a flick of the brush towards the edges. With clouds, rolling the brush around, then flicking an edge here and there might be the best solution. Ground is often a series of short horizontal strokes, reflecting the years of overlapping footprints of man and animals. The directions of strokes over a face in a portrait reflect the anatomical structure beneath. Strokes representing a flowing river tell of the repeating pattern it creates as it travels around rocks and over an uneven river bottom.

How you portray the various characteristics of the elements that make up your paintings is a personal choice, there’s no ONE good solution. I’m suggesting that your paintings will be more dynamic, more interesting, if you consider the actual structure, make up, of the elements in your compositions, then reflect this to your audience with how you use your brush in your paint application.

Say What You Think!

Painting Boop Photo
Photograph © 2016 Vicki Thomas

I’ve been teaching a lot lately, both to adults and, as a Teaching Artist, to kids in school. Having been creating art, in one form or another, since I was a tiny lad, I perform a lot of procedures, make a lot of decisions on auto-pilot, almost unconsciously, when at the easel. Many of these decisions involve critical creative fundamentals. Fundamentals I should be sharing with those in my classes. I’ve found these automatically performed functions to be the most difficult to relay to students. Not because they’re difficult to explain, but because, when I’m in the zone painting, I’m unaware that I’m even performing many of them.

So, I’ve made a conscious effort to make myself aware of every step that occurs, while I’m painting. To write them down, as they occur, for later communication to those in my workshops or classes. I’ve also found that talking through the process with other creative friends, verbalizing procedures, brings these buried faceted automatics out into the light. These conversations also reveal differences in how others works, providing me with even more information to share. If out of the blue, I begin a conversation with you about paint application or simplification of forms, let me apologize in advance, know the annoyance is serving a good cause!

Lifting procedures up onto the surface has been like a trip down memory lane. “When did I pick that up, who taught me that?” It’s a realization of how very many great teachers I’ve had, how many truly accomplished artists I’ve worked beside, how much information has been passed along. I’ve been extremely fortunate! It’s important to reveal and write all this stuff down, then pay it forward!

Chasing Shadows

Ahwahnee Bridge Detail Image
“Ahwahnee Bridge (detail),” by Trowzers Akimbo

One of the most difficult concepts for artists to understand or accept, I find, is color theory. It’s a tough buy-in to ask of anyone who’s been taught all their lives that the primary colors are red, blue and yellow (subtractive color) and that when these 3 are combined, a murky black is the result, to now understand, that with light (additive color), the primary colors are red, blue and green and, when combined, result in white. It doesn’t seem possible!

Subtractive Primaries Image           Additive Primaries Image

An extension of that reluctance of acceptance is the fact that shadows on an object are not just darker versions of the color of that object in light, but, in fact, completely different colors. For example, a red apple’s shadows are actually some form of green, not just a darker red. The consequence of this lack of acceptance is artists just adding black to colors to create shadows, resulting in myriad, otherwise beautifully executed, paintings continuing to exhibit dull, dirty, lifeless shadows.

Viewing Color Image
Red light reflected back to eye.

In hope of convincing those holdouts, let’s quickly review how the eye perceives the color of elements in the world. Clean white light is the resulting combination of all colors in the light spectrum. All colors in the light spectrum being those we see, when this white light is refracted, then reflected by a Prism or in a Rainbow. The various subjects we encounter in the world don’t actually have a color, per se. Instead their molecular make-up either absorbs the various colors of the light spectrum or reflects them off the surface of the subject and back to our eyes. So, when you perceive an apple as red, you’re doing so because that apple could not absorb red colored light and reflects that light back to your eyes. All other colors in the light spectrum (blue, purple, green, yellow, etc.) are absorbed by the apple. In the case of shadows, direct light is blocked, in turn, the light color being bounced back to our eyes is also blocked, leaving a combination of all remaining colors of light in the shadow. Confusing? Yes, but there’s a simpler way to remember this!

Color Wheel Image
The Color Wheel

The color wheel is one of the most important tools in an artist’s paintbox. Among other things, it’s your simple guide to the color in shadows. As it turns out, the shadow color of any given color is its compliment. Take the primaries red, blue and yellow. Yellow’s compliment is violet. Remember our discussion above, stating the shadows of any given color are a combination of all the remaining colors in the color spectrum? Well, those astute readers out there have likely already realized that yellow’s compliment, violet, is the combination of the two remaining primary colors, red and blue. The color wheel makes calculation unnecessary and locates each color’s compliment directly across from it on the wheel.

While there are other factors involved in determining the final color of a given shadow, like value, nearby reflected color, color of the surface on which the shadow falls, etc., knowing the base color of shadows, moves you away from black and assists you in using your eyes to determine what’s really there before you.

Carry a small color wheel around with you, use it diligently to help determine color in shadows and you’ll find, in a very short time, that you have it memorized. Your shadow depth will increase and your paintings become more lively!


Necking

Dirty Paint Tube Photo
Dirty paint tube neck.

I never used to even consider paint tube hygiene to be of any concern in my painting. I just put up with the built up dried, gooey, messy paint that collected around the neck of my paint tubes, the difficulty this caused in getting the caps to screw on properly and even broken paint tube caps. I just thought this was the way all painters lived: simply a cost of doing business in this bohemian world.

After a lifetime in this “dirty” world, I recently discovered a path to a cleaner life. It requires a change of habit and a bit of diligence, but I think I’m up for the task. I’m tired of grinding concentrated bits of pigment into the floor of my studio or tracking it through the house, when a bit of this goop, unseen, falls from the neck of a tube and ends up on the bottom of my shoe.

Clean Paint Tube Photo
Tube neck after cleaning and oiling.

How do you adapt this change in lifestyle? You start by removing the paint goop from the neck of each paint tube in your paintbox. If the tube is almost empty or the gunk is too difficult to remove, just give up on this tube and begin your new regimen of hygiene, when you’ve used the color up and replaced it with a new tube. Once the paint is removed from the neck, apply a drop of linseed, walnut or safflower oil (your oil of choice) to the threads on the neck of the tube. You won’t believe how smoothly the cap now screws on and off. From there, it’s just a matter of wiping away wet paint from the threads, whenever it begins to collect and applying the oil.

Stay the course and your paint tubes will function like well oiled machines. Ugh!