Computers and computer software have played a major role in my working life. As some of you may know, prior to becoming a full-time fine artist, I spent a considerable amount of time earning my living by developing computer games, as chief creative officer. So, I’ve been using image editing applications, like Photoshop (PS), since they first appeared for sale (and many others, before PS arrived on the scene). Finding my way around in apps, like PS, is pretty second nature to me.
Where in the past when I had an idea for a major painting change or addition I wasn’t 100% sure would work, I just had to bite the bullet and try it with paint. When it didn’t work out, I had to scrape out and repair, if I was working with oils, paint over my change, trying to remember what was there before, if working with acrylics or start over from scratch, if working with watercolors. These days, I instead turn to the computer to try out a quick digital preview test, before committing to paint.
You don’t have to be an expert with computer image editing software to perform these digital previews. In most cases you’re just using very basic image editing tools. You also don’t have to purchase Photoshop. There’s a pretty good free image editor offered at: www.pixlr.com that will do the trick.
I’m going to demonstrate my process in Photoshop, but Pixlr works very similarly.
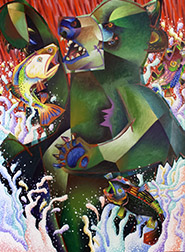
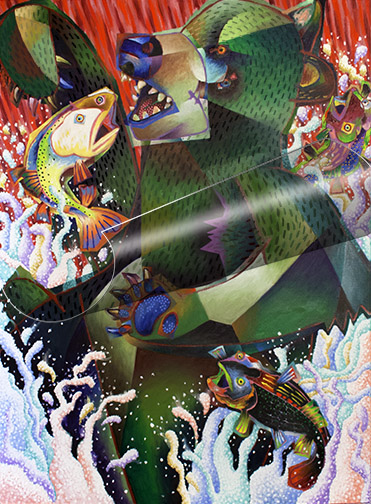
When I was painting the bear in my picture, “Rare Sighting,” from the start I’d intended to cover him with some type of hair pattern, but the detailing I put into the bear was a lot of work. I was concerned about adding the hair pattern on top of this great effort, without testing it first. I didn’t want to have to go back and re-render large parts of the bear, painting the pattern out, if the hair turned out to be a mistake. So I turned to PS.
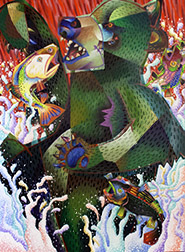
I shot the bear with my digital camera, but you could use your smart phone or tablet to take the shot. I transferred the digital shot to my computer and opened it in PS. Then I created a separate layer, on top of my digital painting image and I painted the hair pattern on this new layer. An added bonus in working this way is that you can turn the layer off and on, flashing back and forth from the painting with the change to the painting without. Something you could never do, if you just added the change to the actual painting.
You’re not limited to simple, straightforward changes like this one. As you become more proficient with the image editor, you can try out just about anything. I’ve tested glazing, color changes, textures, gradients, shadows, you name it, only executing them in the actual painting if they work. I’ve abandoned as many tests, as those I’ve followed through with, but when I followed through, I did so with complete confidence.
I’ve had some tell me they feel this is cheating. That’s a whole lotta’ bull! As the saying goes, they need to get with the program! To not take advantage of new visualization tools made available in the artist paintbox would just be ridiculous! Save yourself a lot of headaches and give digital previewing a try.
Agreed!
Very intriguing.
Thank you for sharing this stunning process. Vicki T.
You’re welcome, Vicki! Give it a try, the next time you face one of those should I add this or not dilemmas.